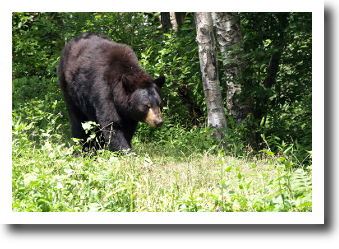
Bob sees a Black Bear across the meadow. It appears to be searching for something. The bear rears up on its hind legs and takes a step backwards. Bob is relieved that the bear is not coming any closer to him.
The bear presses his back against the tree and starts moving up and down. He moves his head back against the tree and gives his back a wonderful scratch.
Bob gets the same sort of pleasure when his practice buddy applies the tree trunk method to his back in Dandasana.
What is Dandasana
Dandasana, which is pronounced dahn-DAH-sah-nah, is the Sanskrit name for Staff pose.
It is a seated pose that you come to between most of the seated postures in your yoga practice. It is the pose you enter after you finish one seated pose and before you enter into the next one.
Dandasana helps to improve your posture, strengthens your back muscles as well as stretching your back and shoulder muscles.
How do you do Dandasana
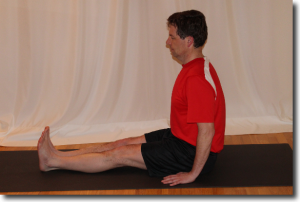
To start with you sit on the floor with your legs together and straight out in front of you. Now you draw your toes towards until your feet are vertical.
Next you adjust your torso so that your back is straight with your shoulders directly above your hips.
And then you rest your hands on the floor with your fingers pointing forward. Like you did with your torso, your shoulders are directly over your wrists and your wrists are beside your hips.
Finally you lift your head slightly and bring your gaze to the horizon. You hold this pose for several breaths.
Now that you are Dandasana you may notice several areas of your body that are being challenged.
What are the challenges with Dandasana
The first is your back. It can be difficult to get your back in the proper position especially if you have short hamstrings.
The second area of challenge in this pose is getting your hands on the floor. This can because of the length of your arms compared to your torso or because your shoulders are lifted up and will not come down.
The tree trunk method deals with the first problem area. The second problem area is dealt with in another article.
What is the tree trunk method
The tree trunk method is intended to you help get your hips, torso and shoulders in good alignment and prevent you from injuring yourself in your lower back and shoulders.
How do you do the tree trunk method
To do the tree trunk method you do not need to look for a tree in the meadow like the black bear. All you need is a practice buddy if your teacher is not available.
First of all you setup in the pose as described above with your torso tall and your legs straight out in front of you.
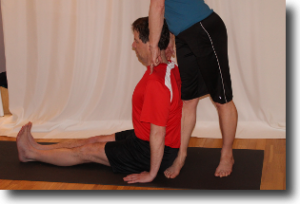
Your practice buddy comes up behind you and stands at a right angle to your body. They put the little toe side of their foot tight to the back of your hip on the mat. Their leg is in line with your spine.
Next your practice buddy moves their hip directly over their foot and then they draw your shoulders and the top of your torso back towards their thigh.
Your practice buddy’s leg is the tree trunk and like the bear you will get great relief when you press back against it.
How does the tree trunk method improve Dandasana
The tree trunk method causes you back to move into the correct curvature. Your lower back is arching forward and your upper back is arching backwards.
When your practice buddy puts their ankle against the back of your hip they are pushing the back of your hips to a vertical position.
Your practice buddy’s calf muscle is causing your lower back to move into its natural forward curve.
When your practice buddy draws your shoulders back towards their thigh they are causing your chest to lift, your back to arch backwards and your shoulders blades to come closer to each other.
The tree trunk method gets your back into a good alignment and prevents you from injuring yourself.
Why you should use the tree trunk method
When we enter this pose there is a tendency for us to round our back and slouch forward. There we sit with our lower back rounded, our ribs dropped down towards our hips and our shoulders and head coming forward and down. This is all bad for our back and the tree trunk method corrects all of this.
The benefits of the tree trunk method
— Protect your lower back
— Fix your upper back
— Correct your hunched shoulders
Lets have a look at the effect that the tree trunk method has on your back starting with your hips and working up from there.
Protect your lower back
There is a tendency for your lower back to round when you enter this pose. The back of the hips is leaning backwards and the lower back is rounded towards the back of your mat. This will cause stress to your lower back muscles.
The tree trunk method protects your lower back from injury by forcing your hips back to a vertical position and restoring a forward bend into your lower back.
Once your lower back is in good alignment we need to fix the rest of our slumping posture by working on the upper back next.
Fix your upper back
When your practice buddy pulls your shoulders back towards their thigh they are causing your ribs to lift up away from your abdomen and your spine to curve backwards.
This movement straightens your back and restores the natural backward curve of your spine. At the same time your ribs are lifting up and you are removing compression from you abdominal area. This movement also brings your shoulders back.
Remove your hunched shoulders
When you enter this pose your shoulders will usually be coming forward and down. The tree trunk method corrects this tendency.
As your practice buddy draws your upper back against their thigh they are also forcing your shoulders to come back from their hunched forward position. Your shoulder blades approach each other and this movement takes pressure off of your ribs and lets you breathe a little easier.
The tree trunk method is very effective in restoring the proper curves to your spine, removing compression from your abdomen and getting your shoulders back to where they should.
If you have short hamstrings, like most people do when they start yoga, it can be difficult to get the tree trunk method implemented unless you take these steps.
But, will the tree trunk method work if I have short hamstrings?
When you have short hamstrings, you can make the tree trunk method work by taking this easy action.
To get the back of your hips vertical you need to bend your knees and bring your heels closer to your hips. Keep lifting your knees up more and more until your are able to move your hips forward and they become vertical. Your practice buddy can tell you when your hips are vertical. They can feel your hip pressing back against their ankle and when it is vertical there will be no more pressure against their ankle.
Once you get your hips straight up and down you can move your feet forward slightly until you feel your hips starting to move backwards. This will apply some stretching to your hamstrings while keeping your back in its proper alignment.
Summary
The tree trunk method helps you to get your back in proper alignment when you do Dandasana. It works on:
– tipping your hips forward to a vertical position
– enforcing the natural forward curve of your lower back
– lifting your ribs and getting your upper back to bend backwards
– brings your shoulders back and down your back.
All of these movements will help you to protect your back from injury in this very simple pose and like the Black Bear maybe you will woof with pleasure when the tree trunk method is applied to your back.
Next Step
Ask your teacher or a practice buddy to work with you to get your back in the correct shape in this pose.
Additional Reading
To learn more about your arms in this pose check out How to build your goal posts in Dandasana
In the short hamstring section above we talked a little bit about moving your feet forward after you got your hips in the right place. This requires you to work with your edge. To learn more about your edge read Goldilocks and three bears discover the Edge.
Dandasana is a foundation seated pose that a lot of other seated poses start from. Similarly Tadasana is a foundational standing pose. Read How to do Tadasana to learn more about Tadasana.


