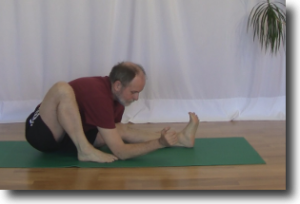
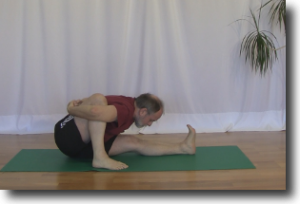
Alice learned a new technique while she was at a weekend yoga workshop recently. She learned about the grounded elbow technique and how it can protect your back while at the same time promoting flexibility in your hip in Marichyasana A. It was a really simple technique that Alice learned in no time at all.
Before we get into the detail of the grounded elbow technique let’s first have a look at Marichyasana A.
What is Marichyasana A?
Marichyasana A is one of the seated forward folds that is part of the Ashtanga Primary Series. It appears slightly before the half way point. There are four variations to Marichyasana that are included in the Primary Series. The grounded elbow technique applies to variation A & B. For simplicity we will be focusing on Marichyasana A in this article.
Marichyasana A works on increasing the flexibility of the hips and shoulders as well as lengthening the hamstring muscles.
How to do Marichyasana A
First you start in Dandasana seated on the floor with your legs together and straight out in front of you.
From here you inhale and bring your right knee up in the air and your right foot back towards your right hip. Your right foot should be about two hand widths away from your left leg and the toe of your right foot should be beside your left knee. The ankle of your right foot will be under your right knee as well.
Next you exhale and bring the top of your hips and your torso forward which will bring your right shoulder in front of and below your right knee.
Now wrap your right arm around your folded right leg and bring your right hand to your back just below your ribs. Next bring your left arm around your back as well. Hold on to your left wrist with your right hand.
Once you have your arms in place move your torso further forward and down towards your extended left leg. Place your chin on your shin just beyond your left knee.
Hold here for several breaths as you gaze toward the big toe of your left foot.
There are several challenging areas in this pose. The grounded elbow technique works on one particular problem area.
What is the problem with this pose?
There is a tendency for a lot of people to round there back in Marichyasana A in an attempt to get their shoulder in front of and below their knee. While you may get your shoulder where you want to you are doing nothing for your hip flexibility and you could potentially injure the muscles in your back.
The grounded elbow technique eliminates this problem.
What is the grounded elbow technique
Alice learnt at the workshop that in order to get deeper into the forward fold and encourage your torso to move forward and down rather than rounding the back you use the grounded elbow technique.
When you bring your shoulder in front of your knee, reach forward with your right elbow and attempt to bring it to the floor in front of your right big toe. In order to get your torso that low to the ground for your elbow to touch the floor you need to tip your hip forward and lengthen and lower your torso.
Bringing your elbow to the floor in front of your big toe is the grounded elbow technique.
How does the grounded elbow technique help?
This technique helps because bringing your elbow to the floor in front of your big toe forces you to lengthen rather than round your back. It also forces you to tip the top of your hips forward to produce more length in your torso. In order for your hips to tip forward your hamstrings have to lengthen as well.
The simple act of reaching forward and down to implement the grounded elbow technique removes the rounded back problem and works on all of the proper stretching at the same time.
But my elbow does not touch the ground
Alice discovered when she first attempted this technique that her elbow did not touch the floor.
This is not unusual. Even though your elbow is not yet on the floor, the fact that you are reaching forward and attempting to put your elbow on the floor in front of your big toe, means that you are straightening and lengthening your back rather than rounding it.
This action of moving froward is protecting your back from injury and working on the flexibility in the hip and lengthening the hamstrings.
Summary
The grounded elbow technique prevents Alice from rounding her back and protects it from injury in Marichyasana A.
She has been using this technique and has been noticing her hip flexibility is improving quite a bit. Pretty soon now she will have her elbow touching the floor in front of her big toe.
Next Step
Ask your teacher to help you implement the grounded elbow technique.
Additional Reading
Your teacher can help you get further into a yoga pose. Read Why your teacher adjusts you in a yoga pose to learn more reasons why your teacher adjusts you.
Using your Edge moves you forward in your yoga practice. The Article How to use the steam engine to find your edge gets on the path.
When a pose is being difficult read Why you should embrace the Ugly Duckling pose
Next Step How to use the grounded elbow technique to deepen your forward fold in Marichyasana A
Alice learnt a new technique while she was at a weekend yoga workshop recently. She learnt about the grounded elbow technique and how it can protect your back while at the same time promoting flexibility in your hip in Marichyasana A. It was a really simple technique that Alice learnt in no time at all.
Before we get into the detail of the grounded elbow technique let’s first have a look at Marichyasana A.
What is Marichyasana A
Marichyasana A is one of the seated forward folds that is part of the Ashtanga Primary Series. It appears slightly before the half way point. There are four variations to Marichyasana that are included in the Primary Series. The grounded elbow technique applies to variation A & B. For simplicity we will be focusing on Marichyasana A in this article.
Marichyasana A works on increasing the flexibility of the hips and shoulders as well as lengthening the hamstring muscles.
How to do Marichyasana A
First you start in Dandasana seated on the floor with your legs together and straight out in front of you.
From here you inhale and bring your right knee up in the air and your right foot back towards your right hip. Your right foot should be about two hand widths away from your left leg and the toe of your right foot should be beside your left knee. The ankle of your right foot will be under your right knee as well.
Next you exhale and bring the top of your hips and your torso forward which will bring your right shoulder in front of and below your right knee.
Now wrap your right arm around your folded right leg and bring your right hand to your back just below your ribs. Next bring your left arm around your back as well. Hold on to your left wrist with your right hand.
Once you have your arms in place move your torso further forward and down towards your extended left leg. Place your chin on your shin just beyond your left knee.
Hold here for several breaths as you gaze toward the big toe of your left foot.
There are several challenging areas in this pose. The grounded elbow technique works on one particular problem area.
What is the problem with this pose
There is a tendency for a lot of people to round there back in Marichyasana A in an attempt to get their shoulder in front of and below their knee. While you may get your shoulder where you want to you are doing nothing for your hip flexibility and you could potentially injure the muscles in your back.
The grounded elbow technique eliminates this problem.
What is the grounded elbow technique
Alice learnt at the workshop that in order to get deeper into the forward fold and encourage your torso to move forward and down rather than rounding the back you use the grounded elbow technique.
When you bring your shoulder in front of your knee, reach forward with your right elbow and attempt to bring it to the floor in front of your right big toe. In order to get your torso that low to the ground for your elbow to touch the floor you need to tip your hip forward and lengthen and lower your torso.
Bringing your elbow to the floor in front of your big toe is the grounded elbow technique.
How does the grounded elbow technique help
This technique helps because bringing your elbow to the floor in front of your big toe forces you to lengthen rather than round your back. It also forces you to tip the top of your hips forward to produce more length in your torso. In order for your hips to tip forward your hamstrings have to lengthen as well.
The simple act of reaching forward and down to implement the grounded elbow technique removes the rounded back problem and works on all of the proper stretching at the same time.
But my elbow does not touch the ground
Alice discovered when she first attempted this technique that her elbow did not touch the floor.
This is not unusual. Even though your elbow is not yet on the floor, the fact that you are reaching forward and attempting to put your elbow on the floor in front of your big toe, means that you are straightening and lengthening your back rather than rounding it.
This action of moving froward is protecting your back from injury and working on the flexibility in the hip and lengthening the hamstrings.
Summary
The grounded elbow technique prevents Alice from rounding her back and protects it from injury in Marichyasana A.
She has been using this technique and has been noticing her hip flexibility is improving quite a bit. Pretty soon now she will have her elbow touching the floor in front of her big toe.
Next Step
Ask your teacher to help you implement the grounded elbow technique.


