The destination is clear, we are going to the beach. There is only one road that takes us to the beach and it is a long and winding one. We can not go fast on this road because it twists and turns and sometimes we have have to pull off to the side and let cars that are coming back from the beach pass us. Finally we reach our destination and we are able to relax and enjoy the sand, sea and sun.
So, what does this journey to the beach have to do with taking your arm on a journey around your back in Ardha Baddha Padma Pashimottanasana?
Attempting to hold your foot by wrapping your arm around your back is very much like the journey that we made down that long and winding road to the beach. It is going to take time but eventually you will reach your goal of holding your foot with your arm wrapped around your back and you too will be able to relax on the beach.
We will be looking closely at the journey that your arm makes down that road but first we are going to look at how to do Ardha Baddha Padma Pashimottanasana.
What is Ardha Baddha Padma Pashimottanasana
The name of this pose translates into English as “Bound half lotus forward bend”.
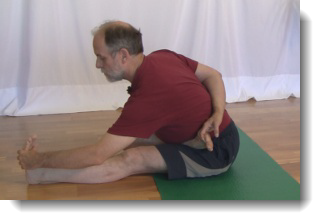
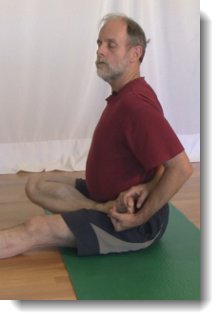
It is a seated forward fold with one leg folded into the hip. You do the pose first with the right leg folded into the hip and then you do it with the left leg folded into the hip. You are holding the big toe of the folded leg with your arm wrapped around your back.
This pose is part of the Primary Series of Ashtanga Yoga and appears early in the seated poses.
How to do Ardha Baddha Padma Pashimottansana
To do this pose you start in Dandasana, which is sitting up straight on the floor with your legs straight out in front of you.
From here you take your right leg and bring the heel into the left hip with the ankle on top of the thigh and the right knee resting on the floor. You hold the little toe side of your right foot with your left hand.
Once the foot is place you reach around your back with your right hand and take a hold of the big toe of the right foot.
After you have a secure grip on your right big toe you bring your torso forward by moving the top of your hips forward towards your extended left leg. As you lower your torso towards your thigh you bring your left hand forward and take a hold of the little toe side of your left foot.
You gaze towards the big toe of your left foot as your lower your torso and head onto your left thigh.
You hold here for five breathes.
Now that you known how to do the pose it is time to look closely at the journey that your arm makes down that long and winding road as it travels across your back and up your foot and finally reaches your big toe.
The journey of your arm begins
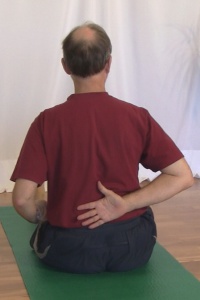
Most people will start out with very little mobility in their shoulders and they will discover that much to their surprise that they can not wrap their arm very far around their back. To complete this journey requires you to develop a great deal of flexibility in your shoulder. The journey starts with your arm around your back.
Stage 1 – Your hand is on your back
Usually your hand will only be able to reach part way across your back. To move further in the journey you work on stretching the muscles in your shoulder by moving your arm gradually and slowly across your back. Holding your arm in place and applying steady tension to your shoulder muscles will help them to stretch and lengthen. You should read the article about Goldilocks and the three bears finding the edge to learn more about how to stretch your muscles safely.
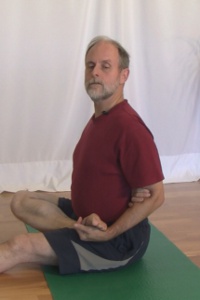
Stage 2 – You reach your elbow
Eventually your shoulder muscles will stretch enough that your hand will be able to touch the elbow of the left arm that is holding the right foot. This is the next stage down that long and winding road.
A lot of people will take a detour at this point and hold the bottom side of the elbow joint. You have turned off the road to the beach and are heading somewhere else. To get back on the road by moving your hand up to the top of the elbow joint and holding the elbow from above.
Once you are holding the elbow firmly from above you have completed this part of the journey and it is time to move on to the next stage.
Stage 3 – You move on to your foot
In this next stage your move your hand gradually down your forearm. You take a hold your arm with you hand and use this grip to stretch the shoulder muscles some more. You accomplish this stretch by lifting your wrist up off of your arm and then move your hand forward down your arm.
As the shoulder muscles stretch some more your hand will continue its journey down your arm and eventually you will reach the next goal, your foot.
Stage 4 – Finally you touch your foot
It is at this stage that you may run into a road block. A lot of people will hold the big toe side of the foot rather than the bottom or little toe side of the foot. When you are holding the big toe side of the foot there is no room for your hand that has been traveling across your back and down your forearm to go on its journey to your big toe. Move your hand to the little toe side of the foot.
Now your shoulder muscles will continue to lengthen as your hand makes its journey one toe at a time from the little to to the big toe of your foot. Once you are touching the big toe with comfort you move on to the next stage in this journey. The beach is almost in sight and you will soon be able to relax.
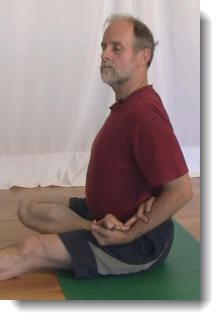
Stage 5 – And then you grab the big toe
Now that you are touching the big toe from behind you continue the journey all the way on top of the foot and you bring your right hand over the top of the foot and hold on to the big toe of your right foot with the first two fingers of your right hand.
We are not done yet. Much like the journey to the beach where after you reach the beach you need to park the car and walk the rest of the way there is one last step in this journey as well.
Stage 6 – Now you turn and face forward
During the journey of the arm around the back to the big toe, most people, myself included, turn their shoulders and twist their back to help the arm in its journey to the big toe. Now that you have a hold of the big toe it is time to turn the shoulders back towards the front.
This final movement in the journey will require more flexibility in your shoulders but eventually the shoulder muscles will lengthen some more and your shoulders will be facing the front of the mat.
It is at this time that you may find your fingers sliding off of your toes. The article How to tame the slippery foot in Ardha Baddha Padma Pashimottanasana tells you in detail how to prevent your hand from sliding off of your foot by bending your toes towards your knee of your right leg.
Why hold your foot
Holding your foot behind your back serves two purposes
1 – It teaches patience
The journey of the arm around the back teaches patience and acceptance with the limitations of your body. The movement of the arm is a long slow process. Gradually the shoulder muscles get more flexible and the movement in the shoulder increases. The arm is able to get further around the back and finally hold on to the toe. For most people this will take many months to accomplish.
2 – It develops flexibility
Completing this journey and finally holding on to the big toe requires a great deal of flexibility in the shoulder and back muscles. This movement of the arm helps you develop that flexibility. As a result you will be able to do many other poses with relative ease and other activities in your life that require flexibility in your shoulder will become easier as well.
Some things to watch out for
– Repeated stretching of your shoulder
You can injury your shoulder muscles if you try to repeatedly, rapidly and quickly stretch your shoulder muscles. This rhythmic movement can result in over stretching and injury. It is much better move the arm into position and hold there while applying gentle, firm and stable pressure to the shoulder muscles. The article about Goldilocks and the three Bears finding the edge goes into this in great detail
– Holding the right foot with your left hand
A lot of people will holding the right foot with the left hand by placing the hand on top of the foot instead of below on the little toe side. This hand placement will be in the way when the right arm finally completes its journey around the back and attempts to hold the big toe. The left hand is already there covering the big toe.
Move the left hand to the bottom of the foot and hold the little toe side. This will free up the big toe and allow the right hand to eventually take a hold of the big toe.
– Turning the torso
In the beginning turning the torso will help with the journey of the arm around the back. However before you fold forward you need to turn your shoulders back to the front. You should not fold forward with your shoulders turned to the side.
Once you do manage to hold your right foot with your right hand you then need to turn the shoulders so that they line up with the front of the mat. Turning your shoulders to the front will complete the development of the flexibility in your shoulder.
Summary
It may seem like an impossible dream to hold your right foot with your right hand in this pose when you first start out, but with patience and repeated frequent practice you will see your arm gradually move down the road of progress across your back, up your foot and finally holding on to your big toe.
With patience and determination you can reach your goal.
Next Step
Your teacher can help you with the journey of your arm around your back. They can help you by guiding your arm along that long and twisting road and make sure that you do not get stuck at a road block or take a detour down a wrong path.

