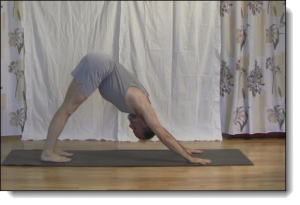
Downward Facing Dog – Adho Mukha Shvanasana

Hold Down Dog for 5 breaths and gaze towards your navel.
In the previous position your inhaled lifted the head and shoulders up and gazed towards the horizon.
In this position, which is a forward bend, you:
- exhale
- roll back over your toes and bring your heels towards the floor.
- lift your hips towards the ceiling
- lower your head and shoulders towards the floor
- and your gaze is towards the navel
How to do it
At the beginning of an exhale roll back over your toes and take your heels towards the floor. At the same time lift your hips towards the ceiling and straighten your arms and legs. Tuck your chin towards your chest and bring your gaze towards your navel. You hold this position for 5 breaths.
Walk your feet in towards your hands about the length of your foot. Your feet should be about hip width apart with the heels a little wider than the toes. The outside of the feet should be parallel with the sides of the mat. This will cause the legs to rotate inwards (clockwise) slightly. Keeping the legs as straight as possible lower the heels towards the floor until there is a gentle stretch in the hamstrings. Lift the arches of the feet and lift the toes off of the floor. This will activate the muscles in the leg.
Take the top of the thighs at the hip joint back towards the wall behind you. Take the top of the hips (the hip crests) down towards the toes of the feet.
The hands should be hip width apart. They should not have moved since you put them to the floor in Position 2 above, when you placed your hands flat to the floor with the fingers spread and the thumbs almost touching the sides of the feet.
It is very important to get the weight distribution correct with the hands on the floor. First of all we need to align the hands properly. The hands are flat to floor, and the wrists are parallel to the end of the mat. The fingers and thumbs are spread really wide. You should feel a stretching in the palms of your hands. The weight is shared equally between the wrist and the top of the palms. The weight is also shared equally side to side. Make sure that all of the joints of the thumb and first finger of each hand are flat to the floor and pressed firmly into the floor. The usual tendency is for the weight to move to outside edge of the wrist. This can cause a great deal of discomfort and pain. Try at all costs to avoid this.
The arms are coming straight out of the wrists and extending to the shoulders. The elbows should not be bent. The eyes of the elbows (the inside of the elbows) should be turned to face each other. There is a slight counter clockwise rotation of the arms to assist with the weight distribution in the hands.
The shoulders are flat to the back and moving away from the ears towards the hips. Alternately you can imagine lowering your torso into your shoulders and arms.
The back is long and the spine is curved slightly.
Tuck the chin in towards your chest and bring your gaze towards your navel.
Uddiyana Bundha is engaged as usual.
There should be a straight line from the hips (at the hip and thigh joint) through the shoulders to the wrists. Also there should be a straight line from the hip and thigh joint through the knees to the ankles. The feet and hands should be flat to the floor.
The weight of the body should be shared equally between the feet and wrists. You shift the weight forward or back by shifting your hips forward or back. Once you are established in the pose do not move your feet or hands to shift your weight.
Modifications
If the hamstrings are tight then you can:
- Bend the knees to relieve the pressure on the hamstrings
- or lift the heels from the floor
If you have pain in your wrists you can use a wedge or sand bag to help alleviate the pain. Put the thick edge of the wedge under the wrist. The wedge should extend for the entire length of the palm and fingers. This will help to shift the weight off of the wrist and on to the top of the palms.
Cautions
Be sure to get the weight distribution correct for your hands. The weight is shared equally between the wrist and the top of the palm and equally from side to side as well. Your palms are flat to the floor with the fingers spread and pointing straight ahead.
Do not overstretch your hamstrings. Leave the knees bent and the heels lifted from the floor. You should feel a comfortable stretch in the hamstrings.
If your shoulders are tight let them rise up from the floor above the line from the hips to the wrist.
Do not lower your torso below the line from your hips to your wrists even if your shoulders a flexible enough. If you do this it will cause undue stress in your shoulders and back.
Next
The seventh position of the Sun Salute series is next. This is the beginning of repeated positions as you start to move back towards Tadasana.
Previous Position (Upward Facing Dog – Urdhva Mukha Shvanasana)
Next Position (Jump forward, lift chest and head)


